Step 1: Add Cloud
This step is required once per tenant. It allows Volumez to automatically deploy the necessary data infrastructure in your account (that is, it enables Volumez to create media nodes). List of permissions can be found here.
In the Volumez dashboard, navigate to QUICK START > Add Cloud.
Select AWS.

Get your AWS account ID number:
In a separate tab, log in to the AWS console.
In the top bar, click on your user name.
Click on the copy button next to your account ID (
.png) ).
).
In the Volumez tab, paste your account ID into the input box.
Set up the IAM configuration required for establishing the connection between Volumez and your AWS account:
Click on
 .
.
This opens the AWS sign in page in a new tab.Sign in.
The Create quick stack page opens in the same tab.Scroll to the bottom of the page.
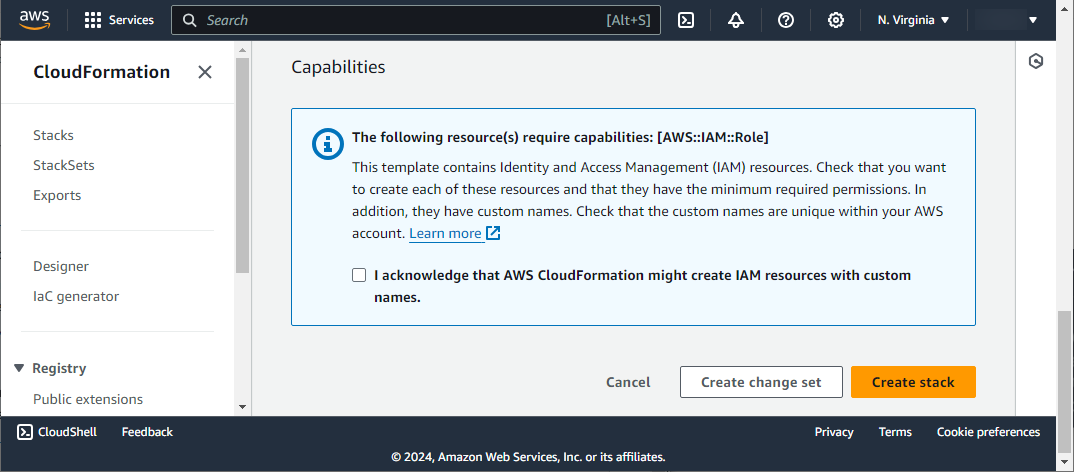
Select I acknowledge that AWS CloudFormation might create IAM resources with custom names.
Click Create stack.
In the Volumez tab, click
 .
.
Step 2: Add Node
In this step, create new Nodes and connect them, or connect existing Nodes.
This step is required once per application.
In the Volumez dashboard, navigate to QUICK START > Add Node.
Choose a selected Operating System.

Follow the on-screen instructions, detailed below, to install Connectors on the defined nodes.

Connect to your bash console.
Copy the on-screen commands and paste them to your bash console, to install the Volumez Connector.
Click on

A list of all added nodes will be displayed in the table at the bottom of the screen.
By default, all columns are shown in that table. You can choose to view or hide individual columns by clicking on the View Columns button.
You can filter the table, to show only certain nodes based on their state (online/ configuring), Operating System, Zone or Connector Version. Click on the Filter Button to set the filtering criteria.
You can also search for specific nodes, by name or by text found in other fields, by clicking on the Search Button and conducting a free-text search.
Step 3: Add Volume
Volumez will create a Volume (Media Nodes and Connectors), and also a Policy and Attachment.
In the Volumez dashboard, navigate to QUICK START > Add Volume.

Choose an Application Node from the drop-down list. Within that list you can also choose to create a new one. This will direct you to the Add Node step, explained above.
Fill in the desired values for Size, IOPS and Bandwidth:
Volume Size: Enter the desired size, between 1 GiB and 64 TiB.
IOPS: Enter the desired value between 1000 and 2,000,000.
Bandwidth: Enter the maximum bandwidth that the volume should expect to sustain, between 1 MB/s and 12,000 MB/s.
If necessary, you can click on Advanced, to configure these additional fields:
Volume Name: Give the Volume a unique name.
Policy: Select the assigned policy for the Volume. If the user provides IOPS and bandwidth requirements, that information is used to create the policy. The assumptions will be 30% writes and local resilience- 1 node. You can override that by explicitly specifying the write ratio, reserved capacity, data protection and encryption.
Volume Attachment:Attach the volume to the selected application. You can also choose to prepare the infrastructure, and carry out the attachment manually, at a later time.
File System Mount: Choose Block to create a raw block device, or File to create an XFS filesystem.
Dedicated Media: Media is defined as dedicated if the Volume is Auto-Provisioned. When selected, Volumez will create the Media for you. Otherwise, you need to create the media manually before creating the Volume.
Encryption at Source: Define whether to encrypt the data.
Data Protection: None, Local with 1 or 2 failure domains, or zonal.
Write Ratio: Define the percentage of the read/ write ratio.
Reserved Capacity Ratio: Define the percentage of reserved capacity. This percentage will be set aside to ensure it is available, even when not currently used.
Region: Select the desired geographic region. AWS Regions consist of multiple, physically separated and isolated Availability Zones. If the Application Node already exists, the field will be pre-populated.
VPC: Select the Virtual Private Cloud dedicated to your AWS account. If the Application Node already exists, the field will be pre-populated.
Zones: Select the desired zone. AWS Availability Zones consist of one or more data centers in separate facilities. If the Application Node already exists, the field will be pre-populated.
Subnets: Select a subnet (range of IP addresses in your VPC). If the Application Node already exists, the field will be pre-populated.
After configuring all fields, the proposed pricing information will be shown, along with all related technical specifications.

If you are satisfied with all settings, click on Create Volume. The resources will be provisioned and configured. This also creates an attachment of the volume to the selected Application Node.
If you delete this Volume, the Media Nodes created for this Volume will be deleted as well.