Connect to your cloud account (AWS)
It is recommended to use the QUICK START > Add Cloud menu option, to benefit from all available functionalities. If you choose not to do so, create a VM in your cloud portal, and then continue to Step 1: Add Node.
This step is required once per tenant. It allows Volumez to automatically deploy the necessary data infrastructure in your account (that is, it enables Volumez to create Media Nodes).
In the Volumez dashboard, navigate to QUICK START > Add Cloud
Select AWS.

Get your AWS account ID number:
In a separate tab, log in to the AWS console.
In the top bar, click on your user name.
Click on the copy button next to your account ID (
.png) ).
).
In the Volumez tab, paste your account ID into the input box.
Set up the IAM configuration required for establishing the connection between Volumez and your AWS account:
Click on
 .
.
This opens the AWS sign in page in a new tab.Sign in.
The Create quick stack page opens in the same tab.Scroll to the bottom of the page.
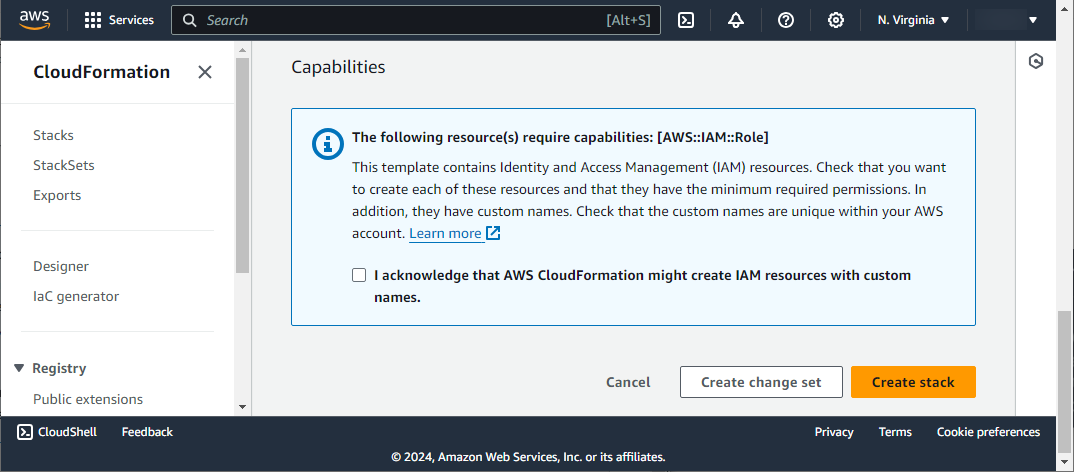
d. Select I acknowledge that AWS CloudFormation might create IAM resources with custom names.
e. Click Create stack.
In the Volumez tab, click
 .
.
Step 1: Add Node
In this step, install Volumez Connectors on all Nodes: Media Nodes and Application Nodes. You can create new Nodes and connect them, or simply connect already existing Nodes.
This step is required once per application.
In the Volumez dashboard, navigate to QUICK START > Add Node.
Choose a selected Operating System.
Follow the on-screen instructions, detailed below, to install Connectors on the defined nodes.
Connect to your bash console.
Copy the on-screen commands and paste them to your bash console, to install the Volumez Connector.
Click on

A list of all added nodes will be displayed in the table at the bottom of the screen.
By default, all columns are shown in that table. You can choose to view or hide individual columns by clicking on the View Columns button.
You can filter the table, to show only certain nodes based on their state (online/ configuring), Operating System, Zone or Connector Version. Click on the Filter Button to set the filtering criteria.
You can also search for specific nodes, by name or by text found in other fields, by clicking on the Search Button and conducting a free-text search.
Managing existing nodes, can also be done at INFRASTRUCTURE > Nodes:

After clicking on Install Connector, follow the on-screen instructions, as done in the Add Node menu, explained above.

Step 2: Assign Media Nodes
Follow these instructions to assign Media Nodes:
In the Volumez dashboard, navigate to INFRASTRUCTURE > Media.

All available nodes with installed Connectors are listed in the table. Select nodes which will function as Media Nodes to serve your Application in the Shared Volume and click on Assign.
Within the list of nodes, you can choose to view or hide individual columns by clicking on the View Columns button.
You can filter the table, to show only certain nodes based on values of various fields. Click on the Filter Button to set the filtering criteria.
You can also search for specific nodes, by name or by text found in other fields, by clicking on the Search Button and conducting a free-text search.
Step 3: Policies
Within Policies, you define the required IOPS and Bandwidth specifications needed for a given Volume.
In the Volumez dashboard, navigate to STORAGE > Policies.

By default, all columns are shown in the Policies table. You can choose to view or hide individual columns by clicking on the View Columns button.
You can filter the table, to show only certain Policies based on fields such as number of Node, Region, Media or Zone Failures, Encryption, Snapshot Frequency and more. Click on the Filter Button to set the filtering criteria.
You can also search for specific Policies, by name or by text found in other fields, by clicking on the Search Button and conducting a free-text search.
You can select a Policy and click on Delete, Modify or Duplicate.
There are 4 predefined Policies, with different trade-offs between resiliency and performance. Reading from nodes in the same geographic zone improves performance under normal circumstances. Reading from nodes in different zones provides better resilience during outages. In terms of resiliency, Zonal means across more than 1 availability zone. Regional refers to all nodes being in a single location. The predefined Policies are Zonal: High and Standard Performance; and Regional: High and Standard Performance.
When you click on New, or when modifying a selected Policy, these are the settings you can define.

Policy Name: Give the policy a unique name.
Optimization: Capacity Optimized or Performance Optimized. If Capacity Optimized is selected, Volumez will use methods such as erasure coding and thin provisioning where relevant, to consume the minimum raw media. This might reduce volume performance, but it will still be within the specified range.
Reserved Capacity (%): This defines how much capacity is reserved up-front for the applications to use. The capacity can be used by the volume and snapshots.
Resiliency: How many media, node or zone failures (for example AWS availability zones or data centers) can be tolerated, while still providing all defined specifications. “0” means any failure may result in data loss or unavailability.
Performance: specify read and write maximum bandwidth values, maximum read and write IOPS values, and maximum read and write latency values, which will be guaranteed.
Avoid Reads Across Zones: Direct Volumez to prefer configurations where reads are usually from disks in the same zone as the application. For optimized performance, choose “yes”.
Encryption at Source: “No” by default. This will consume some CPU cycles on the application, if selected. Use dm-crypt for encrypting data on flight. This might cause higher CPU cycles on the application side.
Require Disk Encryption: “No” by default. This will direct Volumez to use only media with disk encryption capabilities if selected.
Click on Submit to finalize your settings.
Step 4: Volumes
Create a Volume to serve your Application requirements. Use a Policy name from the previous step to define the Volume capabilities.
In the Volumez dashboard, navigate to STORAGE > Volumes to define your volume’s settings or go to QUICK START > Add Volume. To begin, click on Create Volume.

Give the new volume a name.
Define the volume type: Mounted XFS file system or Raw block device.
Select the associated policy.
Define the volume size.
Choose the assigned geographic zone.
An error will be displayed if the requested specifications cannot be supplied given the defined volume parameters, for example if there is a lack of Media Nodes configured in the specified zone.
Click on Create Volume to finalize your settings.
After creating volumes, all will be displayed in a table as shown below, in STORAGE> Volumes.

These are the available options to manage and edit volume settings.
Create PVC: A Persistent Volume Claim is needed when working with Kubernetes.
Resize: Define a new size for the selected volume.
Rename: Give the selected volume a new name.
Attach: Define an attachment between a volume and an Application Node.
Change Owner: Change Volume user owner.
Create PVC Snapshot: For Kubernetes persistent storage.
Create Snapshot: Create a Snapshot for the selected Volume.
PVC Rollback: For Kubernetes persistent storage.
Rollback: Return the Volume to its condition at the snapshot time.
Recover: Replace a failed Media Node.
Delete PVC: For Kubernetes persistent storage.
Delete: Delete a Volume and all parts associated.
Force Delete: Delete a Volume even if some parts are unavailable/offline.
By default, all columns are shown in that table. You can choose to view or hide individual columns by clicking on the View Columns button.
You can filter the table, to show only certain Volumes based on their State, Policy, Volume State, Type or Owner. Click on the Filter Button to set the filtering criteria.
You can also search for specific Volumes, by name or by text found in other fields, by clicking on the Search Button and conducting a free-text search.
Step 5: Attachments
Go to STORAGE > Attachments, and manage your Attachments.